Optimise Your Shed: Best Flooring & Storage Options

Converting a garden building into a practical, year-round space is one of the smartest home improvements you can make. This guide focuses on the Best Flooring and Storage Options for Transforming Your Shed into a Usable Space, helping UK homeowners and hobbyists choose shed flooring and shed storage ideas that suit workshops, studios, home offices, gyms or simple storage hubs.
With shed conversion UK projects rising, material choice must reflect local climate. Frequent rain, high humidity and cold winters affect durability, moisture control and insulation. That means prioritising moisture-resistant finishes, comfortable underfoot surfaces and storage systems that keep tools and belongings dry and organised.
Read on for clear decision-making criteria: durability, moisture resistance, comfort, insulation, cost and ease of installation. We reference trusted UK suppliers such as Wickes, B&Q, Howdens, Toolstation and RubberflooringUK, and note common trade practices and building regulations where relevant.
Inhaltsverzeichnis
Key Takeaways
- Choose shed flooring that balances moisture resistance with comfort and insulation.
- Prioritise materials and systems suited to UK weather to avoid damp and rot.
- Use durable shelving and wall-mounted storage to maximise floor space.
- Match flooring type to intended use — workshop, studio or storage hub — for best results.
- Consult reputable suppliers like Wickes, B&Q and Toolstation for compliant products and practical advice.
Why Choosing the Right Flooring and Storage Matters for Your Shed
Choosing suitable flooring and storage shapes how you use a shed. A firm, level floor supports benches and cabinets, so shed usability rises for tasks such as woodworking or potting. Lightweight seasonal storage needs a different approach from a full-time workshop; pick materials that match intended use to boost shed comfort and reduce fatigue during long sessions.
Impact on day-to-day use
Hard floors give stability for workbenches and make sweeping easy. Adding anti-fatigue mats or cushioned tiles improves standing comfort for hobbyists and makers. Thoughtful storage placement keeps tools within reach, cutting time spent searching and lifting heavy items, which improves storage efficiency and safety.
Durability under UK conditions
The UK climate tests materials with regular rain, damp and wide temperature swings. Floors and fittings must resist moisture, rot and mould to limit shed maintenance UK needs. Options such as treated timber, moisture-resistant boards, vinyl, rubber or sealed concrete perform well when paired with damp-proof membranes and adequate subfloor ventilation.
Maintenance routines
Regular sealing, repainting and checking joints extends longevity and reduces costly repairs. Addressing condensation and ensuring airflow around joists prevents rot. Following British Standards for damp control gives a clear framework for long-term protection and effective shed weatherproofing.
Storage efficiency and organisation
Load-bearing capacity dictates where heavy shelving can go without risking floor damage. Wall-mounted systems and high-quality shelving free floor space for larger tasks and protect items from ground moisture. Modular shelves, labelled zones and clear pathways speed retrieval and enhance storage efficiency.
Practical safety and access
Match floor height to doorway thresholds to avoid awkward steps that hinder wheeling equipment in and out. Anti-slip finishes reduce slip risk in wet weather. Secure anchoring for cabinets and tall shelving prevents tipping when doors slam or during windy weather, supporting both safety and long-term shed usability.
Best Flooring and Storage Options for Transforming Your Shed into a Usable Space

Begin with a durable base and plan storage around it. A concrete slab or a raised insulated subfloor gives solid support for heavier use. Add a wear layer such as luxury vinyl tile, engineered wood, laminate or interlocking tiles for finish and protection. Tailored wall systems, shelving and overhead racks complete the layout and keep the floor clear.
Overview of combined flooring and storage strategies
Phase the work to protect finished surfaces. Fix moisture and level the base first. Install the chosen flooring next. Fit shelving and wall-mounted systems last to avoid scuffs and damage. This staged method improves longevity and reduces rework when exploring shed conversion options.
How to match flooring type to intended use
For a workshop pick impact-resistant options. Sealed concrete, rubber tiles or heavy-duty interlocking PVC tiles stand up to tools and spills. Place anti-fatigue mats at workstations to ease strain.
For an art studio choose easy-clean, flat surfaces such as LVT or sealed engineered wood with a wear-resistant finish. Combine with dust-minimising cabinets and proper lighting to protect materials and work.
For a home office or hobby room favour warmth and comfort. An insulated subfloor with engineered wood or laminate feels inviting. Add area rugs for acoustics and comfort underfoot.
For storage-only use cost-effective, moisture-resistant solutions. Vinyl roll or treated plywood on raised battens keeps goods dry. Pair with strong shelving that lifts items off the floor to maximise capacity and prevent damp damage.
Budgeting and cost-benefit analysis for combined upgrades
Costs vary by materials and labour. Budget band one includes DIY interlocking tiles and vinyl roll for minimal spend. Mid-range covers engineered wood, professional vinyl fitting and modular shelving. Premium involves hardwood, bespoke cabinets and specialist subfloor insulation.
Factor lifecycle costs into decisions. Add initial material and fitting, expected durability and maintenance. Consider heating savings from insulation if the shed is used year-round. Compare shed upgrade costs with renting a workspace or building an extension to measure likely return on investment.
| Use | Recommended Flooring | Storage | Typical Cost Band |
|---|---|---|---|
| Workshop | Sealed concrete, rubber tiles, PVC interlock | Heavy-duty shelving, tool rails, pegboards | Budget–Mid |
| Art studio | LVT or sealed engineered wood | Cabinets, dust-proof drawers, workbench | Mid |
| Home office / hobby | Insulated subfloor with engineered wood or laminate | Shelving, storage cabinets, cable management | Mid–Premium |
| Storage-only | Vinyl roll, treated plywood on raised battens | Adjustable shelving, overhead racks | Budget–Mid |
Think long term when you choose materials and systems. Smart combinations of combined flooring and storage can expand usable space and raise property practicality without large construction. Evaluate shed conversion options with clear priorities so you can match flooring to use while keeping an eye on shed upgrade costs.
Hardwood and Engineered Wood Flooring Choices for Sheds
Choosing timber for a shed turns a cold box into a comfortable workspace. Solid hardwood has a warm look and long service life indoors. An engineered wood shed brings greater dimensional stability where humidity swings are common in UK gardens.

Pros and cons in outdoor-adjacent environments
Solid hardwood offers classic grain and can be sanded and refinished many times. It resists dents from light use but fares poorly if it sits above a damp subfloor. Expansion and contraction are real risks on uninsulated bases.
Engineered wood combines a real wood wear layer with a layered core. That core reduces movement and makes an engineered wood shed a safer choice over warm, insulated subfloors or suspended battens. The visual effect is close to solid timber while lowering the chance of cupping or warping.
Preparation and moisture-proofing requirements
Start with a stable, level subfloor such as OSB or marine-grade plywood fixed over joists. Avoid laying any timber directly on bare earth. Use a damp-proof membrane where moisture could rise from below.
Choose breathable insulation like Celotex PIR within the subfloor assembly to control heat loss and condensation. Seal all joins and fit thresholds to limit water ingress at doors. Follow manufacturer guidance on expansion gaps and consider moisture-resistant underlays to add protection.
Maintenance tips to extend lifespan
Routine timber shed floor maintenance keeps boards performing for years. Clean with products recommended by the flooring brand and avoid soaking the surface. Reapply varnish or oil finishes when the top coat shows wear.
Inspect joists and subflooring for mould or rot, particularly after wet winters. Keep ventilation free and seals tight around doors and windows. Use rugs in busy zones and felt pads under heavy cabinets or machinery to reduce localised wear.
For anyone aiming to combine aesthetic comfort with practical resilience, balancing surface finish, subfloor preparation and regular timber shed floor maintenance will deliver the best results for hardwood shed flooring or an engineered wood shed while controlling risks through targeted wood flooring moisture-proofing.
Practical Vinyl, Laminate and Rubber Flooring Solutions
Choosing the right floor for a shed shapes its use and upkeep. This short guide compares vinyl, laminate and rubber options so you can match performance to purpose. Each choice balances water resistance, comfort underfoot and cleaning needs.

Water resistance and easy-clean attributes
Vinyl offers excellent water resistance and is simple to maintain. Luxury vinyl tile (LVT) or roll vinyl works well where damp can occur. An easy-clean shed floor made from vinyl tolerates spills, mud and frequent mop use without damage.
Laminate is improving. Water-resistant laminate shed flooring performs well in drier, insulated sheds. Traditional laminate needs sealed joints and a waterproof underlay to avoid swelling at seams.
Rubber is highly water-resistant and resists oil and grease. A rubber shed floor suits workshops and gyms where cleaning may require degreasing. Some products emit a mild odour at first; airing the space usually clears that.
Comfort underfoot and anti-slip options
Rubber and cushioned vinyl deliver better anti-fatigue properties for standing tasks. These surfaces reduce strain during long DIY or gardening sessions.
For wet or high-traffic areas choose anti-slip shed flooring with textured finishes or commercial R-rated surfaces. Textured vinyl, embossed LVT and coarse rubber tiles all improve grip when the floor is damp.
Recommended products and installation methods
Trusted UK suppliers include B&Q, Wickes, Amtico for premium LVT and RubberflooringUK for specialist rubber tiles. Pick materials suited to your subfloor and usage.
For installation over concrete or plywood use adhesive or loose-lay vinyl for a smooth finish. Click-lock vinyl or laminate suits floating installations above an underlay. Interlocking rubber tiles offer a DIY-friendly fit and easy replacement.
Prepare the subfloor by levelling, cleaning and drying thoroughly. Use a smoothing compound for small imperfections. Leave expansion gaps where required and seal edges at door thresholds to keep moisture out.
| Feature | Vinyl (LVT/roll) | Laminate | Rubber |
|---|---|---|---|
| Water resistance | Excellent; suitable for damp sheds | Variable; use water-resistant grades with underlay | Outstanding; resists water, oil and grease |
| Cleaning | Easy-clean shed floor; mop or wipe | Easy if sealed; avoid saturation | Hoseable in many cases; degrease for stains |
| Comfort | Medium; cushioned options available | Firm; less forgiving for long standing | High; excellent anti-fatigue properties |
| Slip resistance | Good with textured finishes | Moderate; add mats where needed | Very good; natural grip and textured tiles |
| Installation | Adhesive, loose-lay or click systems | Click-lock floating over underlay | Interlocking tiles or adhesive fit |
| Best use | Studios, storage, damp-prone sheds | Dry, insulated sheds; light workshops | Workshops, gyms, heavy-use areas |
Modular and Interlocking Tiles for Flexible Layouts
Modular options give shed owners quick, adaptable ways to improve floors without major building work. Interlocking systems suit temporary setups and rental properties because they install fast and remove easily. A single damaged tile can be lifted and swapped, saving time and cost compared with full-floor replacement.
Benefits of DIY installation and reconfiguration
DIY-friendly interlocking shed tiles click together with no glue or specialist tools. This makes installation possible in a single afternoon for many users. Reconfiguration is simple when needs change; move workbenches, create new walkways or lift tiles to inspect the subfloor.
Types: PVC, polypropylene, and rubber tiles
PVC shed tiles are lightweight and affordable. They work well in light-duty storage, hobby spaces and places where a textured finish helps grip. Polypropylene tiles resist chemicals and UV light, so they are a sensible choice for garages and workshops where oil and solvents are present.
Rubber interlocking tiles provide impact absorption and anti-fatigue comfort. Use them where dropped tools or heavy foot traffic are likely, for instance in a home gym or busy workshop. Rubber is heavy and stable, giving a robust feel underfoot.
How to create zoned areas with modular tiles
Design zones by mixing tile types and colours. Lay non-slip rubber under a workbench, smooth PVC along circulation paths and drainage-capable polypropylene in wet corners. Colour contrasts mark safe walkways and storage bays at a glance.
Protect thresholds with edging strips and plan channels for cables or drainage to avoid trip hazards. For heavy machinery, spread the load across continuous surfaces or add reinforcement under concentrated loads to protect the modular shed flooring.
- Quick repair: replace single tiles rather than an entire floor.
- Flexibility: reposition tiles to suit changing projects.
- Custom zones: combine PVC shed tiles, polypropylene and rubber interlocking tiles for tailored performance.
Concrete Floor Options: Repairing, Sealing and Finishing
Concrete floors form the backbone of many UK sheds. A sound approach to concrete shed floor repair, sealing and finishing will extend service life and make the space usable for hobbies, storage or a workshop.

Repairing cracks and levelling uneven concrete
Start by assessing the slab. Small surface cracks suit a cementitious repair mortar; hairline cracks often respond well to flexible fillers. Large or moving cracks need a structural appraisal from a qualified contractor.
Use a bonded patch for hollows and a self-levelling compound to smooth dips before laying finish materials. Follow manufacturer guidance on moisture vapour transmission limits when preparing to seal concrete shed surfaces.
Sealants, epoxy coatings and anti-slip finishes
Sealers stop dusting and cut water ingress. Choose a breathable silane or siloxane product where moisture escape matters. For workshop floors, an epoxy shed floor gives durability and an easy-clean surface.
Apply an epoxy primer and confirm slab dryness before coating. Add anti-slip aggregate to the topcoat in walking or work zones for safer footing. Consider polyurethane or MMA coatings if you need faster cure times or greater chemical resistance.
Insulation and subfloor solutions for cold concrete
Concrete conducts cold. To insulate concrete shed floors, rigid PIR boards beneath a screed or a floating insulated subfloor can make a large difference to comfort and condensation control.
Sheds on slabs benefit from suspended battens with treated plywood decking above insulation. This creates a warmer, drier surface and protects finishes against rising damp. Ensure edge ventilation and appropriate damp-proof membranes to meet local building guidance when you insulate concrete shed floors.
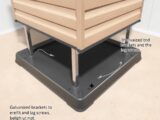
Raised and Insulated Subfloors for Comfort and Protection
A raised shed floor gives a straightforward way to lift timber or floor panels away from damp ground or cold concrete. This approach protects finishes and stored items from moisture and mould while creating a useful void for services and insulation. A well-planned raised shed floor improves thermal comfort and reduces noise transfer, making sheds more pleasant for workshops and hobby rooms.

Benefits of a raised subfloor in damp locations
Raising the floor prevents direct contact between timber and wet surfaces, cutting the risk of rot. The void beneath the floor allows pipes, cables and underfloor insulation to be routed without cutting into the finish. This reduces the need for unsightly surface channels and helps keep tools and stored goods dry.
Insulation choices to retain heat and reduce condensation
PIR rigid boards suit many builds where thin, high-performance panels are needed. Mineral wool offers good acoustic dampening where sound control matters. Closed-cell spray foam can fill awkward voids but needs careful vapour control to avoid trapping moisture against joists. For a typical shed floor insulation UK owners favour PIR beneath OSB or exterior-grade plywood for a neat, warm finish.
Installation tips for longevity and ventilation
Use pressure-treated timber for joists and allow air gaps beneath boards to encourage airflow. Fit ventilation grilles or routed vents to keep the void dry and help prevent condensation. Install a damp-proof membrane where local guidance suggests it and seal service penetrations to stop draughts and vermin.
Ensure joist spacing and panel thickness suit the intended load. Check manufacturer load ratings and use OSB or exterior-grade plywood for strength. Leave a small expansion gap at edges and finish with skirting to conceal the gap while allowing movement.
| Issue | Recommended solution | Key benefit |
|---|---|---|
| Cold floor in winter | PIR rigid board under plywood | High thermal performance with minimal depth |
| Condensation risk | Breathable insulation plus vapour control layer | Manages moisture while protecting timber |
| Uneven ground or damp base | Raised joist system on treated supports | Prevents moisture ingress and allows services |
| Acoustic transmission | Mineral wool between joists and resilient fixings | Reduces impact and airborne noise |
| Complex service routing | Insulated subfloor shed with service void | Simplifies wiring and plumbing without surface cuts |
Storage Systems: Shelving, Cabinets and Wall-Mounted Solutions
Fitting the right storage makes a shed far more useful. Think about what you store and how often you need it. Choose systems that stand up to damp UK conditions and keep tools, compost and kit accessible.
Select galvanised steel or powder-coated racks from reputable suppliers such as Sealey or items stocked at Toolstation and Wickes. Check load ratings per shelf and favour adjustable designs when you mix heavy plant pots, bags of compost and toolboxes. Anchor shelving to studs or wall plates to prevent tipping and spread weight across multiple fixings for safety.
Cabinet options
Metal lockable cabinets offer security for valuable tools and chemicals. Resin cabinets from brands like Keter resist moisture and weigh less for easier positioning. Use sealed cabinets with rubber feet or raise them on shelving to avoid damp. Fit tight seals and add silica gel packs for dust-sensitive items and long-term protection.
Wall-mounted systems
Pegboard shed storage lets you hang hand tools for quick access. Choose perforated metal or hardboard and invest in quality hooks and organisers to avoid droop and slippage. Slatwall systems supply flexible attachment points for baskets, hooks and holders for long-handled tools. TradeQuip-style panels work well when mounted to studs or rail battens.
For heavy items, use appropriate anchors for timber frames or masonry. Distribute weight across rails and consider extra bracing for long-handled tools and lawnmowers. Label shelves and cabinets and keep hazardous substances in ventilated, labelled storage that follows COSHH guidance for pesticides and fuels.
Combine shed shelving, heavy-duty shed storage, shed cabinets UK, pegboard shed storage and slatwall systems to create zones: a workshop area, a garden supplies bay and a locked cabinet for valuables. Simple labelling and an inventory list keep the space efficient and secure.
Space-Saving Ideas: Vertical Storage, Hooks and Overhead Racks
Good shed design turns clutter into usable space. Focus on vertical shed storage and smart hangings to free the floor for work and access. Small changes, such as wall-mounted holders and overhead solutions, make a big difference in safety and convenience.
Using vertical space effectively for long-handled tools
Install wall-mounted racks, broom holders and vertical tool hangers to keep spades and rakes upright and tidy. Slatwall panels and rubberised grips prevent handle damage and stop tools sliding down. This hanging tools shed approach reduces trip hazards and creates clear walking lanes.
Overhead racks for seasonal and bulky items
Fit ceiling-mounted or joist-hung overhead shed racks to store infrequently used goods like insulation rolls or holiday boxes. Secure fixings into rafters and observe load limits to avoid accidents. Consider pulley-assisted hoists for heavy or awkward items such as kayaks and large boxes.
Smart hanging solutions for bicycles and garden equipment
Use heavy-duty wall hooks, fold-down brackets or dedicated rails to transform a bicycle storage shed into a neat, accessible area. Pad contact points to protect frames and set hooks at a comfortable height for lifting. For petrol lawnmowers, choose foldable brackets or wheeled bases so bulky kit can be moved with ease.
Keep clearances for door swing and pathways when positioning systems. Label zones and check weight limits regularly to maintain a safe layout. Regularly review stored items to prevent accumulation and keep the shed performing as an efficient, space-saving shed ideas hub.
Conclusion
This shed conversion summary pulls together the practical choices that matter most. Choose flooring that balances moisture resistance, durability and comfort, and deal with subfloor and insulation before fitting finishes. In damp UK conditions, engineered boards, vinyl or rubber and raised insulated subfloors often give the best balance of longevity and comfort.
Pair flooring with the right storage to free the floor and protect contents. Heavy-duty shelving, wall-mounted pegboards and modular cabinets work well with interlocking tiles or sealed concrete. Use the decision framework: assess intended use, budget, local climate and load requirements, and favour modular systems for flexibility and phased upgrades.
For practical next steps, survey the shed: measure floor area, check for damp, inspect joists and concrete. Plan a phased approach — moisture control, subfloor and insulation, finished flooring, then storage installation. Source products from reputable UK suppliers such as B&Q, Wickes, Toolstation, Howdens, Amtico and RubberflooringUK and consult tradespeople for structural or major concrete work.
These shed renovation takeaways show that sensible material choices and clear storage planning will optimise shed UK use. A considered approach to the best flooring and storage options turns a neglected outbuilding into a durable, comfortable and organised space for hobbies, work or storage.
FAQ
What flooring is best for converting a garden shed into a year‑round usable space?
The best option balances moisture resistance, insulation and durability. For most UK sheds a raised, insulated subfloor clad with engineered wood or luxury vinyl tile (LVT) works well. Engineered wood gives a warm finish for a home office or studio, while LVT or rubber tiles suit workshops and gyms due to water resistance and easy cleaning. For heavy-duty workshops, sealed concrete or epoxy over a sound slab is a robust choice. Always include a damp‑proof membrane, ventilation and leave expansion gaps as per manufacturer guidance.
How do I prevent damp and condensation under shed flooring?
Start with site assessment: check for standing water, poor drainage or blocked vents. Install a damp‑proof membrane (DPM) over concrete slabs or use a breathable membrane beneath raised subfloors. Provide underfloor ventilation or vented skirting to keep joists dry. Use treated timber, exterior‑grade OSB or marine plywood and fit vapour control layers where insulation could trap moisture. Regularly inspect seals at doors and windows and maintain exterior cladding and guttering to reduce moisture ingress.
Can I fit hardwood flooring directly on a shed subfloor?
Solid hardwood is generally not recommended directly on an uninsulated or moisture‑prone subfloor because it expands and contracts with humidity. If you prefer a timber look, choose engineered wood over a stable, insulated subfloor with a suitable vapour barrier. Ensure the subfloor is level, dry and ventilated, and follow manufacturer instructions for acclimatisation and expansion gaps. For higher‑risk locations, consider LVT with a wood effect as a more forgiving alternative.
Are interlocking tiles suitable for DIY shed floors?
Yes. Interlocking PVC, polypropylene or rubber tiles are ideal for DIY projects. They are quick to lay, require minimal subfloor preparation, and allow sections to be lifted and replaced if damaged. PVC and PP tiles are lightweight and chemical‑resistant; rubber tiles offer anti‑fatigue and impact protection. Ensure the subfloor is reasonably flat and secure edging strips at thresholds to avoid trip hazards.
How should I insulate a concrete slab shed floor?
Insulate by either installing rigid PIR boards over the slab followed by an isolation layer and floor finish, or by building a suspended insulated subfloor with treated joists and insulated panels or PIR between them. A floating insulated subfloor with exterior‑grade plywood provides a warmer surface and a service void. Always use compatible DPMs and check moisture vapour transmission limits of finishes before applying adhesives or moisture‑sensitive layers.
What flooring is best for a workshop that will see oil, tools and heavy equipment?
For workshops choose impact‑resistant, oil‑tolerant and easy‑clean surfaces: sealed concrete with an epoxy or polyurethane coating is robust and chemical‑resistant. Heavy‑duty rubber tiles or polypropylene garage tiles also perform well, absorbing shocks and protecting dropped tools. Reinforce subfloor beneath concentrated loads and use anti‑fatigue mats at workstations to reduce strain.
How do I choose storage systems to keep items off damp floors?
Opt for galvanised or powder‑coated metal shelving and raised cabinets to resist corrosion. Fit shelving anchored to studs or structural plates, not only to cladding. For moisture‑sensitive items use sealed lockable metal cabinets or resin cabinets from brands like Keter. Combine wall‑mounted slatwall, pegboards and vertical tool racks to free floor space and keep goods elevated from any residual damp.
What are practical space‑saving storage ideas for small sheds?
Use vertical storage: wall rails, slatwall panels and dedicated tool hangers for long‑handled tools. Install overhead racks or pulley hoists for seasonal items and consider fold‑down brackets for bulky equipment like lawnmowers. Bicycle hooks and foldable brackets free floor area. Keep circulation clear by zoning with different floor finishes or colours and label storage bays for quick access.
Are there recommended UK suppliers for shed flooring and storage?
Yes. Reputable suppliers include B&Q, Wickes, Howdens and Toolstation for general flooring and fittings. Specialist options such as RubberflooringUK, Amtico and Gerflor offer LVT and rubber systems. For shelving and workshop equipment look at Sealey, TradeQuip and Gripit products stocked by Toolstation and Wickes. Always check product specifications and statutory guidance where structural or damp issues are involved.
How much should I budget to upgrade shed flooring and storage?
Budget bands vary by finish and complexity. DIY budget options (interlocking tiles, vinyl roll, basic shelving) are the most affordable. Mid‑range projects (engineered wood or professional vinyl installation, modular cabinetry) increase costs but improve longevity. Premium upgrades (bespoke hardwood, bespoke cabinets, specialist subfloor insulation and professional structural work) carry higher upfront costs but better lifecycle value. Factor in insulation, DPM, ventilation, and any professional labour—these can be decisive for durability and comfort.