Securing Sheds: Anchor Plastic or Metal to Base

This short introduction explains practical guidance on how to anchor a plastic shed or metal shed to a plastic shed base for homeowners and tradespeople across the United Kingdom. The aim is simple: reduce wind uplift, deter theft, limit movement from ground settlement and ensure safe, long‑lasting performance of the shed.
Common brands you will encounter include Keter, Duramax, Forest and Palram; fixing points and base designs vary by manufacturer, so check the maker’s guidance as you plan. This article covers a range of options from ground anchors and augers to bolt‑down systems to concrete, strap anchors and specialist plastic shed base fixings suitable for both plastic and metal structures.
We also touch on legal and safety matters: local planning rules, boundary issues and Building Regulations can affect installation, so consult your local council if unsure. What follows is a clear structure: understanding risks and benefits, step‑by‑step anchoring instructions, tools and materials, methods by base and ground type, and maintenance and inspection advice.
Inhaltsverzeichnis
Key Takeaways
- Securing shed to base prevents wind damage, theft and ground movement.
- How to anchor a plastic shed or metal shed to a plastic shed base varies by brand and base design.
- Shed anchoring UK solutions include ground anchors, bolt‑down kits and plastic shed base fixings.
- Metal shed base anchor work needs corrosion prevention and appropriate isolation washers.
- Check local planning rules and Building Regulations before installation.
Understanding Shed Anchoring: Why Secure Your Plastic or Metal Shed
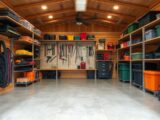
Securing a garden outbuilding goes beyond neatness. Proper anchoring protects your investment, lowers maintenance bills and reduces the chance of damage to people or neighbouring property. Good anchoring improves shed safety and makes routine use simpler.
Risks of an unanchored shed
Lightweight plastic or metal units can lift or slide in a gust, creating a wind uplift shed scenario that damages roofs and fences. Shifts break seals and distort panels, which allows water ingress and accelerates decay.
Theft and unauthorised removal become real problems when fixings are absent or weak. Opportunistic thieves target unsecured stores of power tools, bicycles and garden kit, so shed theft prevention starts with a solid base connection.
Liability rises if a loose structure causes injury or property damage. Neighbours may face costs, while insurers may refuse claims if anchors were omitted. That risk profile makes simple anchoring a smart precaution.
Benefits of proper anchoring for longevity and safety
Anchored sheds show far less movement, which reduces wear on doors, hinges and seals. That stability extends the life of plastic and metal panels and keeps the building weather-tight for longer.
Security improves when a shed is fixed to a robust base. Anchors deter thieves by removing easy lifting points, so shed theft prevention measures are more effective when combined with good locks and strong fixings.
Insurers often view permanently fixed outbuildings more favourably. Anchoring can support a claim after storm damage and help meet policy conditions, cutting long-term costs linked to repairs and replacements.
How wind, theft and ground movement affect sheds
Wind loading acts on roof and wall areas to create uplift and lateral forces. A wind uplift shed event occurs when those forces exceed the shed’s attachment strength. Lightweight materials need anchors sized to local exposure to resist gusts.
Ground movement such as frost heave, clay shrink-swell and subsidence causes differential movement that stresses fixings and the base. Anchors must either resist such forces or allow controlled movement without damaging the shell.
Thieves exploit weak points like ill-fitted doors, unbraced panels and loose base fixings. Fixing the frame to a solid base removes simple removal tactics and shifts attention away from your tools and machinery.
Selecting the right solution depends on local wind exposure, soil type and security needs. Tailor your approach to balance resistance to uplift, mitigation of ground movement and effective shed theft prevention for long-term shed safety.
How To Anchor A Plastic Shed Or Metal Shed To A Plastic Shed Basev
Anchoring a shed correctly starts with recognising the limits and benefits of a plastic base. Plastic shed base anchoring must balance light weight with secure fixing points. Read the base maker’s guidance before you start. Some bases have pre-formed fixing positions that simplify the process.

Overview of anchoring considerations specific to plastic shed bases
Plastic bases resist rot and sit well on soil, paving or concrete. They are often ribbed and hollow, so fixes that rely on direct bolt-throughs can fail without reinforcement.
Steel reinforcement plates or resin anchors spread loads across ribs. Maintain designed drainage and ventilation when drilling or fitting plates. Follow manufacturer torque limits to avoid cracking.
Compatibility issues between shed materials and base types
Consider compatibility shed base relationships before choosing fixings. Metal shed frames are stiffer and heavier than plastic sheds and can concentrate loads on small base points.
Use corrosion-resistant fasteners such as stainless steel or galvanised fixings where metal meets metal. Add isolation washers to prevent abrasion where metal contacts plastic. Match anchor type to the substrate beneath the base, because fixing through plastic into soil differs from fixing into concrete.
Step-by-step summary of the anchoring process
- Assess the site: check the plastic base, substrate, shed model and local wind exposure.
- Choose anchors: select ground anchors, bolt-down kits or strap anchors suited to the substrate and shed weight.
- Prepare the base: mark fixing points and fit steel plates or use resin injection where the plastic needs reinforcement.
- Drill and install: use the correct bits, insert anchors or resin and allow proper cure time.
- Attach the shed: fix the frame with corrosion-resistant fixings and isolation washers to protect contact points.
- Test and adjust: check alignment and tighten to manufacturer torque settings without over-tightening.
- Finish: apply protective coatings where needed and confirm drainage and ventilation remain clear.
Types of Anchors Suitable for Plastic and Metal Sheds
Choosing the right anchor depends on ground type, shed size and the base material. Below are common shed anchor types with practical notes to help you pick an option that suits a plastic or metal shed on a plastic base.

Ground anchors and augers
Screw-in auger anchors, often called helical or earth anchors, thread into soft soil to deliver excellent pull-out resistance. Most are galvanised or hot-dip galvanised to resist corrosion in the UK climate.
Use anchors with turnbuckles and straps when concrete is not available. These allow adjustment of tension and good uplift protection. Aim for at least four anchors at corners or base plate points; increase depth and number for larger sheds or exposed sites.
Concrete anchors and bolt-down kits
Chemical resin anchors create a strong bond in concrete beneath a plastic base and work well with threaded studs or bolts. Mechanical options such as sleeve anchors, wedge anchors and coach screws provide reliable fixing into slabs.
Bolt-down kits from established manufacturers often include pre-formed plates and expansion bolts matched to the frame profile. These kits simplify alignment and deliver consistent performance when installed to manufacturer guidance.
Strap anchors and heavy-duty brackets
Heavy-duty steel brackets fix to base edges and to the shed frame to spread loads and resist lateral movement. Webbing straps with ratchet systems give flexible restraint for uplift and pair well with ground anchors or padstones.
When fixing through thin plastic, use reinforcement plates in steel or aluminium under the base to spread loads and avoid cracking. Pick galvanised, stainless steel or coated fixings to reduce corrosion risk over time.
| Anchor type | Best ground | Pros | Cons |
|---|---|---|---|
| Helical auger (ground anchors for sheds) | Soft to medium soil | High pull-out resistance, adjustable with turnbuckles | Less effective in very rocky ground |
| Chemical resin anchors | Concrete | Very high load capacity, excellent for thin plastic base over concrete | Requires correct drilling and resin mixing |
| Mechanical concrete anchors (bolt-down kits) | Concrete and slabs | Simple installation, widely available bolt-down kits match frames | Expansion may stress old or weak concrete |
| Strap anchors (strap anchors) | Soft ground, pads, mixed | Flexible, works with ground anchors or padstones, good for uplift | Requires correct tensioning and reinforcement plates under plastic |
| Heavy-duty brackets | Paved areas, concrete, prepared bases | Excellent lateral resistance, spreads load across frame | May need precise alignment and extra reinforcement |
Materials and Tools Needed for Anchoring
Good preparation saves time on site. The right tools for anchoring sheds and the correct fixings for plastic shed base work together to create a durable installation. Below are essentials split into practical groups to help you plan purchases and pack a sensible kit.

Essential hand and power tools
A cordless drill or a hammer drill with a range of masonry and HSS bits is vital for most bases. Use spanners and a socket set sized to your bolts and nuts for secure tightening. A torque wrench or calibrated driver helps avoid over-tightening that can crack plastic bases.
Keep an angle grinder or a hacksaw to cut plates or rebar on site. Small items such as screwdrivers, a centre punch, measuring tape and a spirit level complete the basic set. For screw-in ground anchors, bring an auger driver or a manual T-handle.
Recommended fixings and corrosion-resistant materials
Select corrosion-resistant fasteners to match the environment. Hot-dip galvanised anchors suit general outdoor use. For coastal sites, opt for stainless steel bolts A2 for standard exposure or A4 for severe marine conditions.
Resin anchors give excellent load capacity in concrete. Choose resin anchors from reputable manufacturers such as Fischer or Hilti for consistent performance. Use galvanised or stainless steel base plates and brackets where prolonged exposure will occur.
Add isolation washers in nylon or neoprene to prevent metal-on-metal abrasion and to protect plastic panels from chafing. Use zinc-plated components with protective coatings only where long-term corrosion risk is low.
Protective equipment and site preparation supplies
PPE is non-negotiable. Safety glasses, cut-resistant gloves, ear protection and a dust mask are must-haves when drilling or cutting. Lay ground protection boards to protect lawns and provide stable access.
For base levelling use a weed membrane topped with sharp sand or compacted aggregate. Keep sealants such as butyl or silicone to weatherproof bolt heads and drilled holes. Carry rust-inhibiting primer and paint to treat any cut steel on site.
| Item | Purpose | Suggested Specification |
|---|---|---|
| Cordless drill / Hammer drill | Drill holes in plastic, metal and masonry | 18V with HSS and masonry bits set |
| Spanners & Socket set | Tighten bolts and nuts to specified torque | Metric set to 4–19 mm |
| Torque wrench / Driver | Prevent over or under-tightening of fixings | 10–60 Nm range |
| Angle grinder / Hacksaw | Cut metal plates or rebar to size | 115 mm grinder or fine-tooth hacksaw |
| Auger driver / T-handle | Install screw-in ground anchors | Compatible with anchor shaft diameter |
| Hot-dip galvanised anchors | Primary ground or slab fixing | Grade to suit load; M8–M12 common |
| Stainless steel bolts (A2 / A4) | Corrosion-resistant fastening | A2 for inland, A4 for coastal locations |
| Resin anchors | High-strength fixing into concrete | Systems from Fischer or Hilti; correct cartridge for substrate |
| Galvanised or stainless base plates | Spread loads and secure shed base | Thickness 3–6 mm depending on span |
| Isolation washers (nylon / neoprene) | Protect dissimilar materials and prevent abrasion | Appropriate ID/OD for chosen bolts |
| PPE (glasses, gloves, ear protection, dust mask) | Operator safety during drilling and cutting | EN and CE marked where required |
| Ground protection boards & levelling materials | Protect site and provide stable working surface | Timber or plastic boards; sharp sand or aggregate for levelling |
| Sealants and rust-inhibiting paint | Weatherproof and protect exposed metal | Butyl/silicone sealant; zinc-rich primer and topcoat |
Anchoring to a Plastic Shed Base: Techniques and Tips
Preparing a plastic base correctly makes every fixing stronger and safer. Inspect the moulded ribs, hollow cells and any factory fixing points. Clean away debris and check the substrate beneath the base, whether soil, paving or concrete. If reinforcement plates or pads will sit under the base, ensure you can access the underside before beginning work.

Preparing the plastic base for fixings
Mark proposed anchor positions and consult the shed maker’s guidance for permitted locations. For bases over concrete, plan drill depths so holes pass through the plastic and reach solid substrate. For hollow sections, record cavity dimensions to select suitable fixings that will not collapse the cell walls.
Using reinforced plates for plastic base
Steel reinforcement plates spread load and stop bolt heads pulling through thin plastic. Position plates beneath or above the base so they sit across ribs. Use captive or flange nuts where underside access is limited. Where plates sit directly on plastic, place isolation washers or a thin rubber pad to reduce stress concentrations and prevent abrasion.
Using resin anchors for shed base
When fixing into concrete beneath a plastic base, drill with the correct masonry bit and blow out dust. Inject a chemical anchor such as an acrylic or epoxy resin and insert threaded studs or rebar to the manufacturer’s depth. Allow the specified cure time for products like Hilti HIT or Fischer FIS before loading the anchor. For hollow cells, use cavity-specific resin systems or purpose-made plug anchors that expand within the void.
Avoiding common mistakes
Do not over-tighten fasteners. Excess torque will crack plastic or distort profiles. Use torque settings and isolation washers to protect the material. Choose the correct drill bit for the substrate and pilot-drill where needed to avoid oversized holes that weaken the base.
Preserve drainage and ventilation. Do not seal vents or water channels when fitting reinforcement plates, particularly where timber floors lie above the base. Pre-drill and trial-fit brackets to prevent poor alignment that could stress frame fixings. Use stainless or galvanised fixings and treat any cut steel edges to reduce the risk of rust at the junction between metal plates and the plastic base.
Anchoring a Metal Shed to a Plastic Base: Best Practices

Anchoring a metal shed to a plastic base needs careful attention to fastening, corrosion and thermal movement. Use fixings that resist the UK’s damp climate and allow slight movement so the structure stays sound over time.
Corrosion prevention shed anchors begins with choosing the right materials. Galvanised or A2 stainless steel bolts work well inland, while A4 stainless steel is best for coastal locations. Avoid bare steel where moisture can sit; saddle plates or protective pads help keep metal off wet surfaces.
The next step is to use isolation washers for sheds at all metal-plastic junctions. Nylon, EPDM or neoprene washers prevent abrasion and spread load. Where bolts pass through the base, bonded rubber sealing washers stop water ingress beneath the plastic.
Protect cut edges on brackets with a rust-inhibiting primer and suitable topcoat. If you use resin-injected anchors or through-bolts, seal the exposed threads and recesses to limit corrosion and lengthen service life.
Allow for thermal movement when securing the frame. Metal expands and contracts with temperature changes, so use slotted holes, slightly oversized washers or anti-vibration washers to give small clearance. Check the frame is square and the door works before final tightening.
Combine rigid brackets with flexible straps or turnbuckles where uplift risk exists. This mix keeps the shed stable in wind while letting minor movement occur without stressing connections.
| Issue | Recommended Fixing | Why it Helps |
|---|---|---|
| Coastal corrosion | A4 stainless steel bolts and nuts | Resists chloride-driven corrosion better than A2 or galvanised steel |
| Metal-plastic abrasion | Nylon or EPDM isolation washers | Prevents wear, distributes load and insulates contact points |
| Water ingress at bolt holes | Bonded rubber sealing washers | Seals the hole and reduces cavity moisture under the base |
| Thermal movement and vibration | Slotted plates, anti-vibration washers, flexible straps | Allows movement without loosening, maintains tension under vibration |
| Exposed cut edges on brackets | Rust-inhibiting primer and topcoat | Seals bare steel, reducing long-term rust spots |
Anchoring on Different Ground Types: Soil, Concrete and Paving
Choosing the right fixings depends on ground type and site conditions. This short guide explains practical techniques for anchoring shed on soil, fixing shed to concrete and managing a shed base on paving slabs. It also covers solutions for an uneven ground shed anchor so installers can pick the safest option.
Soft ground and turf
For soft or grassy sites, screw-in auger anchors give good holding power when driven well below the frost line. Use long spike anchors or augers paired with straps or turnbuckles attached to the shed frame to spread the load.
When peat or organic soils are present, place a compacted hardcore or a concrete pad under the plastic base before fixing. Padstones or concrete blocks beneath anchor heads help prevent pull-through on very soft surfaces. Maintain good drainage around the base to preserve anchor capacity.
Fixing to concrete and slab bases
Drill using a hammer drill and use mechanical expansion anchors, wedge anchors or resin-injected studs for high pull-out resistance when fixing shed to concrete. Clean holes of dust before inserting resin or mechanical fixings; follow curing and torque instructions supplied by the manufacturer.
When bolts pass through a plastic base, fit a steel reinforcement plate beneath the base to distribute forces and avoid local cracking. If paving slabs sit over concrete and are loose, lift slabs and fix into the concrete sub-base or relay the slabs onto a compacted bed prior to anchoring.
Paving slabs and uneven surfaces
Relaying slabs to achieve a level bed is the preferred option for a shed base on paving slabs. If relaying proves impractical, use adjustable pedestals or shims under the plastic base to level the shed and reduce point loads.
Avoid anchoring into single loose slabs. Instead, use wide baseplates and multiple anchor points so load spreads across several slabs and lowers the chance of cracking. Always check for buried services with a cable detector or local utility advice before drilling or driving anchors.
Practical checklist
- Match anchor type to ground: augers for soil, resin or wedge anchors for concrete.
- Use reinforcement plates under plastic bases when fixing shed to concrete or slabs.
- Improve drainage and compact soft soils before anchoring shed on soil.
- For uneven ground shed anchor solutions, prefer distributed plates or adjustable supports over single-point fixes.
- Confirm no buried services before any drilling or deep driving of anchors.
Planning, Permissions and Site Preparation
Before any work begins, check local requirements and plan access. In many UK gardens small outbuildings fall within permitted development, but variations exist between councils. Confirm whether shed planning permission UK rules affect your project, especially if the siting is near a road, forward of the house, or within a conservation area.
Neighbourly matters matter. Review shed boundary rules and speak with adjacent owners when the base or structure sits close to a shared fence. Gaining written consent avoids disputes over rights of way and keeps installations compliant with party wall and boundary expectations.
Consider services. Installing electricity or drainage can change permit needs and may trigger Building Regulations. Factor in any trenching or connections early so the chosen position does not block future access for engineers or emergency work.
Preparing the footprint starts with a firm, even platform. A level shed base supports anchors, doors and shelving. Use compacted hardcore with paving, a concrete slab, or a manufacturer’s plastic base laid on a smooth, prepared sub-base. Remove sharp objects and check tolerances with a spirit level.
Drainage prevents decay to timbers and corrosion to fixings. Provide falls for surface water and ensure runoff does not pond beneath the base. For plastic bases, confirm the supporting surface is smooth and free of debris that could puncture or deform the moulded sections.
Plan access for delivery and future maintenance. Measure gate widths, path strength and turning space for installers and consider temporary mats to protect lawns during construction. Leave clearance around the shed so anchors can be inspected and replaced if needed.
Anticipate future loads. If heavier storage or shelving is likely, build the base and anchors to suit those demands. Site preparation shed base choices should reflect expected weight, use and longevity, reducing the need for disruptive upgrades later.
Maintenance and Inspection of Anchors and Shed Base
Regular upkeep keeps a shed secure and prolongs its life. A simple schedule and clear checks help owners spot problems early and plan repairs before damage spreads.
Routine checks and tightening schedule
Inspect anchor points and fixings every six months and after storms. Check bolt tension and retighten to manufacturer torque values without over-tightening.
Examine straps, turnbuckles and ground anchors for slippage. Adjust tension as necessary and log each action with date, part checked and result to track shed anchor maintenance over time.
Signs of movement, wear or corrosion to watch for
Look for cracks in the plastic base and elongated bolt holes. Rust on brackets, loose bolts, sagging corners or doors that stick are clear visual cues to inspect shed base more closely.
Check the ground for newly exposed anchor heads, heave or settlement near anchors and pooling water beneath the base. Pitting, flaking or brown rust on galvanised parts shows the protective layer has failed and needs attention.
Repairing or upgrading anchors over time
Replace corroded anchors with stainless steel equivalents or higher-spec fixings. If the original layout proves insufficient, add extra anchors rather than relying on the same pattern.
When plastic base damage is evident, fit reinforcement plates and replace cracked panels. For persistent failure, consider moving to a concrete pad or underpinning with concrete footings.
Uplift or movement caused by soil conditions may need deeper helical anchors installed by a specialist. After repairs, re-check alignment, door operation and reseal any penetrations to maintain weatherproofing.
| Inspection Item | Frequency | Signs to Watch | Recommended Action |
|---|---|---|---|
| Anchor bolts and brackets | 6 months; after severe weather | Loose bolts, rust, elongated holes | Retighten to torque; replace corroded parts; log work |
| Straps and turnbuckles | 6 months; after storms | Slippage, fraying, reduced tension | Adjust tension; replace worn straps; add plates if needed |
| Plastic base condition | 6 months; whenever movement suspected | Cracks, sagging panels, exposed anchor heads | Fit reinforcement plates; replace panels; consider concrete pad |
| Ground around anchors | 6 months; after heavy rain/frost | Settlement, heave, pooling water | Improve drainage; underpin base; use deeper anchors |
| Overall alignment and doors | Annually; after repairs | Doors sticking, misaligned frames | Realign frame; reseal joints; verify anchor performance |
Conclusion
Correctly securing a garden shed starts with choosing the right anchor for the job. Whether you need to know how to anchor plastic shed panels or anchor metal shed to plastic base, the choice depends on shed material, base design and ground conditions. Using corrosion-resistant fixings and following manufacturer guidance reduces risk and prolongs the structure’s life.
For thin plastic bases, reinforcement plates or resin-injected anchors give a stronger hold than simple screws. On concrete or paving, use appropriate concrete anchors and bolt-down kits; for soft soil, ground anchors or augers are usually best. These selections directly affect shed safety UK owners should expect.
Plan the installation carefully: check local rules, assess access and drainage, and record a maintenance schedule. Inspect anchors after storms and at regular intervals to spot movement, wear or corrosion early. If you face complex ground conditions, heavy sheds or high-wind exposure, consult a qualified installer or structural engineer to specify suitable anchors and base reinforcement for long-term security and peace of mind.
FAQ
What is the main reason to anchor a plastic or metal shed to a plastic shed base?
Anchoring reduces wind uplift, deters theft, prevents movement from ground settlement and ensures safe, long-lasting performance of the shed. Proper anchoring protects doors, seals and panels from distortion and supports insurance and compliance requirements in the UK.
Which common UK shed brands should I consider when following anchor guidance?
Many homeowners encounter brands such as Keter, Duramax, Forest and Palram. Fixing points and recommended kits vary by manufacturer, so always check the specific model’s instructions before selecting an anchoring method.
Can I fix a plastic base directly with concrete bolts?
Not usually. Plastic bases are often ribbed and hollow and cannot accept standard concrete bolts without reinforcement. Where concrete lies beneath the plastic base, the correct approach is to drill through the plastic, fit a reinforcement plate and use chemical resin anchors or mechanical anchors into the concrete.
What anchor types work best on soft ground or turf?
Screw-in auger ground anchors or long spike anchors combined with straps and turnbuckles are effective on soft ground. For very soft or peat soils, install a compacted hardcore or concrete pad beneath the plastic base or use padstones to spread load and improve holding capacity.
How many anchors should I use for a typical garden shed?
A basic recommendation is at least four anchors—one at each corner or base plate point. Larger sheds, exposed sites or higher wind zones will require more anchors and deeper embedment. Anchor count should match shed size, local wind load and soil type.
What materials and fixings should I choose for longevity in the UK climate?
Use corrosion-resistant materials such as hot-dip galvanised anchors or stainless steel bolts (A2 for general use, A4 for coastal sites). Select branded resin systems from manufacturers like Fischer or Hilti when anchoring into concrete, and use neoprene or nylon isolation washers where metal meets plastic.
How do I prevent damage to the plastic base when fitting bolts or straps?
Fit steel reinforcement plates above or below the plastic base to distribute loads. Use bonded or sealing washers to protect hole edges and prevent water ingress. Avoid over-tightening fasteners—use torque settings and isolation washers to stop cracking or tear-through.
Are there special considerations when anchoring a metal shed to a plastic base?
Yes. Prevent corrosion by specifying galvanised or stainless fixings and using isolation washers between metal and plastic. Allow for thermal movement by using slotted holes or flexible straps and check alignment before fully tightening to permit minor adjustments.
How should I fix a shed when the plastic base sits on paving slabs?
Avoid fixing into individual loose slabs. Where possible relay slabs onto a compacted sub-base or lift and fix to the concrete below. If relaying is impractical, use wide baseplates and multiple anchors to spread load across several slabs and reduce the risk of cracking.
Can I use resin-injected anchors with a plastic base present?
Yes—provided you drill through the plastic into the concrete or slab beneath, clean the hole, inject the correct resin (acrylic or epoxy as specified by the resin manufacturer) and allow the full cure time. Use reinforcement plates where access beneath the base is limited.
What tools and PPE will I need for an anchor installation?
Essential tools include a cordless drill or hammer drill with masonry and HSS bits, spanners and a socket set, torque driver, auger driver for screw anchors, and measuring tools. PPE should include safety glasses, gloves, ear protection and a dust mask. Use ground protection boards if required.
How often should I inspect shed anchors and fixings?
Inspect anchor points and fixings at least every six months and after severe weather. Check bolt tension, straps, turnbuckles and look for signs of corrosion, elongated holes, cracks in the base or soil movement. Keep a maintenance log for long-term tracking.
What are the signs that my anchoring is failing or needs upgrading?
Look for cracked or distorted plastic bases, loose or corroded bolts, sagging corners, doors that stick, exposed anchor heads or newly settled ground around fixings. If failure recurs, consider stronger anchors, deeper footings or switching to a concrete pad.
Do I need planning permission to anchor a garden shed in the UK?
Most small garden sheds fall within permitted development, but siting, size and whether electrical or drainage works are added can affect requirements. Check GOV.UK guidance and local council rules; consult Building Regulations if in doubt, especially for enlargements or fixed services.
When should I consult a specialist or structural engineer?
Seek professional advice for complex ground conditions, heavy or bespoke sheds, high-wind exposure or where deep underpinning is required. A qualified installer or structural engineer can specify helical anchors, concrete footings or bespoke reinforcement for long-term safety.
Are there quick fixes that I should avoid when anchoring sheds?
Avoid relying solely on small screws into thin plastic, fixing to loose paving slabs, over-tightening fasteners, or sealing ventilation channels. These shortcuts can worsen movement, cause water ingress, reduce ventilation and accelerate corrosion or base failure.
What sealing or finishing steps are recommended after anchoring?
Seal bolt heads and drilled holes with an appropriate butyl or silicone sealant to prevent water ingress. Treat exposed steel cut edges with a rust-inhibiting primer and paint. Ensure reinforcement plates do not block designed drainage or ventilation beneath the base.
How do local soil types affect anchor selection?
Soil type greatly changes performance: cohesive clays and frost-susceptible soils may need deeper or concrete footings; sandy or granular soils suit helical or screw-in anchors with larger embedment. For peat or very soft soils, install a compacted structural pad or consider specialist anchors.